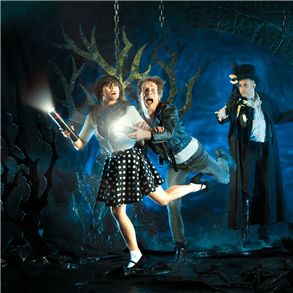
 Michael Blase has been in the photography business serving the theatrical advertising market from lower Manhattan since 1995. Today Blase Photography creates photographs of constructed realities for performers, directors, designers and event organizers. Here’s the catch. Michael does not rely on CGI. He builds complete sets and props for the models, actors or performers to interact with. The sets become the canvas on which he places the actors and lighting for the perfect photo shoot!
Michael’s photographs are so surreal that he often presents the actual source photographs to his clients to show that they are in fact CGI free! We just had to sit down with Michael to learn about his unique style and how he uses RhinoCAM from MecSoft Corporation to help manufacture his constructed realities!
The RhinoCAM Difference
Michael started out doing composite photography but wanted something more realistic so he started constructing his own set designs. Michael is an avid user of Rhinoceros modeling tools from McNeel & Associates and is a big fan of parametric modeling and Grasshopper. He has extended Rhino with his own Python scripts and Grasshopper with his own C# scripts. He also utilizes other user shared scripts. This led to the need for CNC machining and in 2014 he purchased a ShopBot CNC router. The ShopBot shipped with VCarve but Michael quickly wanted a CAM program with a better workflow with Rhino.
“Having to export curves in one program, then open them in another and convert them to toolpaths was time consuming. Worse, if I had to make a small change in one part, I had to export all the curves again and convert them all into tool paths all over again. Also, the conversion from one program to another often introduces anomalies in the final result.”
Here’s more of what Michael had to say about RhinoCAM.
 |
“I first started out using VCarve because it came with my ShopBot CNC router. However, because I design in Rhino, moving files between the two systems quickly became a burden. Also making design changes between the two systems took even more time. That’s when I migrated to RhinoCAM.” Michael Blase, Owner/Operator Blase Photography, New York, NY |
The RhinoCAM Project
 Here is a small example of a typical RhinoCAM machining job that Michael creates. It is an attachment plate design for the quarter section frame shown below. The frame is for a circular window prop. There are 4 quarter sections that are attached using the plate design shown here. While the frame sides only require simple 2½ axis profiling strategies, the attachment plates consist of drilled holes, circular pockets, irregular pockets and profiles, all 2½ axis toolpaths included in the RhinoCAM standard configuration.
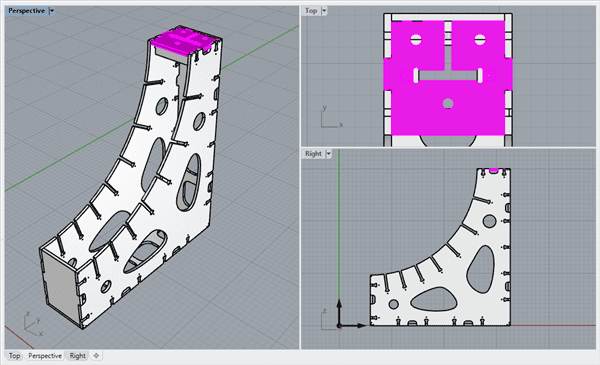
The Machining Setup
This mating plate is used to mate and fasten each quadrant of the set design prop shown in Rhino above. It consists of a 12” x 18” x ½” stock of plywood within which two mating plates are machined. The single setup (large end plates) includes 2½ Axis and Hole Making toolpath strategies. Drilling, Pocketing, Hole Pocketing and Profiling are used in this setup. The machining job tree and part features are illustrated below.
 Hole Pocketing and Profiling. |
 |
In the images below we see each operation in this setup. (A) Consists of a Standard Drill operation with a ⅛” drill x 0.22 deep (8 places total). The operation includes minimum distance sorting. (B) Consists of a 2½ Axis Hole Pocketing operation that machines 4 holes, 1” diameter x ½” deep (thru) using a 3/8” flat end mill, climb cut, 0.091” stepover, 0.25” stepdown with a cleanup pass at each cut level and 0.25” dia. x 0.25” pitch helical engagement.
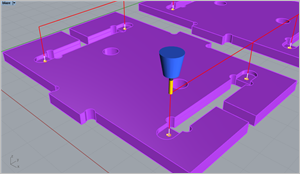 ⅛” Standard Drill x 0.22 deep (8 places total) with minimum distance sorting. |
 2½ Axis thru Hole Pocketing, 1” diameter x ½” deep using a 3/8” flat end mill. |
Image (C) Consists of a 2½ Axis Shallow Pocket, 8 places, 0.19” deep, offset cut pattern, mixed cut direction, ramp entry and cut arc fitting. Finally (D) consists of 2½ Axis Profiling, 2 places, ½” deep, 2 cut levels, with 6 triangular tabs, 0.1” high x 0.4” wide. You can see the tabs clearly in the Cut Material Simulation images below.
 2½ Axis Shallow Pocket, 8 places, 0.19” deep, directional sort, using a ⅜” diameter end mill. |
 2½ Axis Profiling, 2 places, ½” deep, 2 cut levels, with 6 triangular tabs, 0.1H x 0.4W. |
The Cut Material Simulation
The cut material simulation for this setup is illustrated in the two images below. On the left we see the four operations, Drilling (red), Hole Pocketing (green), Pocketing (magenta) and Profiling (blue). On the right we see the bottom of the part after the Profiling operation is completed giving a good view of the bridges and tabs remaining after the Profiling operation is complete.
 The cut material simulation shows the Drilling, Hole Pocketing, Pocketing and Profiling operations. |
 A view of the Bridges & Tabs left from the Profiling operation. These are removed manually. |
Here are two construction photos of the assembled quad circular frame in Michael’s studio. You quickly see that this stage piece becomes the frame in which to focus the viewers’ attention into the constructed set. When viewing the Blase Photography portfolio, you will see multiple constructed realities where Michael utilizes this set piece. Nice!
 |
 |
| Set props under construction at Blase Photography | |
|
Cool project Michael!
|

More about Blase Photography
 Michael Blase is a member of ASMP, the American Society of Media Photographers. If you live near or have visited Manhattan you may recognize samples of Michael’s work from postcards, flyers, subway posters, juried exhibits, Time Out New York, The New York Times, The New York Daily News, The New York Post, The Village Voice, The Villager and others. You can also visit and follow Michael on his website at blase.photography and be sure to check out his extended portfolio on Instagram.
Here are more constructed realities from Michael Blase. See the complete portfolio here.
Which is your favorite?
[foogallery id=”21430″]
Production images from Blase Photography. All set designs completed using Rhino 6.0. All machining of set designs and props done with RhinoCAM toolpaths.
More about RhinoCAM
RhinoCAM – MILL is available in five different configurations (Express, Standard, Expert, Professional and Premium). The part shown here was programmed using the Standard configuration. Here are some additional details about each of the available configurations. For the complete features list, visit the RhinoCAM Product Page.
- RhinoCAM MILL Express: This is a general-purpose program tailored for hobbyists, makers and students. Ideal for getting started with CAM programming. Includes 2 & 3 axis machining methods. Includes ART & NEST modules as well!
- RhinoCAM MILL Standard: This configuration includes everything that is in the Express configuration and additional 2-1/2 Axis, 3 Axis & Drilling machining methods. Also now includes 2½ Axis Turning!
- RhinoCAM MILL Expert: Suitable for 4 Axis rotary machining. Includes the Standard configuration, plus 4 Axis machining strategies, advanced cut material simulation and tool holder collision detection.
- RhinoCAM MILL Professional: Ideal for complex 3D machining. Includes the Standard and Expert configuration, plus advanced 3 Axis machining strategies, 5 Axis indexed machining, machine tool simulation, graphical toolpath editing and a host of other features.
- RhinoCAM MILL Premium: Tailored for complex 3D machining with both 3 Axis and full 5 Axis methods. Includes the Standard, Expert and Professional configurations, plus 5 Axis simultaneous machining strategies.
For the complete features list, we invite you to visit the RhinoCAM Product Page:

Powerful production CAM for Rhino users!


