If your machining jobs include large stock sheets then you might have a need to CAM a large number of holes of various sizes. Programming hundreds of holes can be time consuming if you have to select each hole individually. Happily RhinoCAM (and VisualCAD/CAM) provides you with tools that make the selection of large numbers of similar geometry such as circles, lines, curves, etc. These tools are located on the Regions tab of the Machining Objects Browser of RhinoCAM. Continue reading below to learn how.
The Part
For this discussion we will use the following 1” thick sheet geometry that is approximately 24” wide by 36 inches long. The sheet contains over 400 holes of varying sizes that need to be drilled.

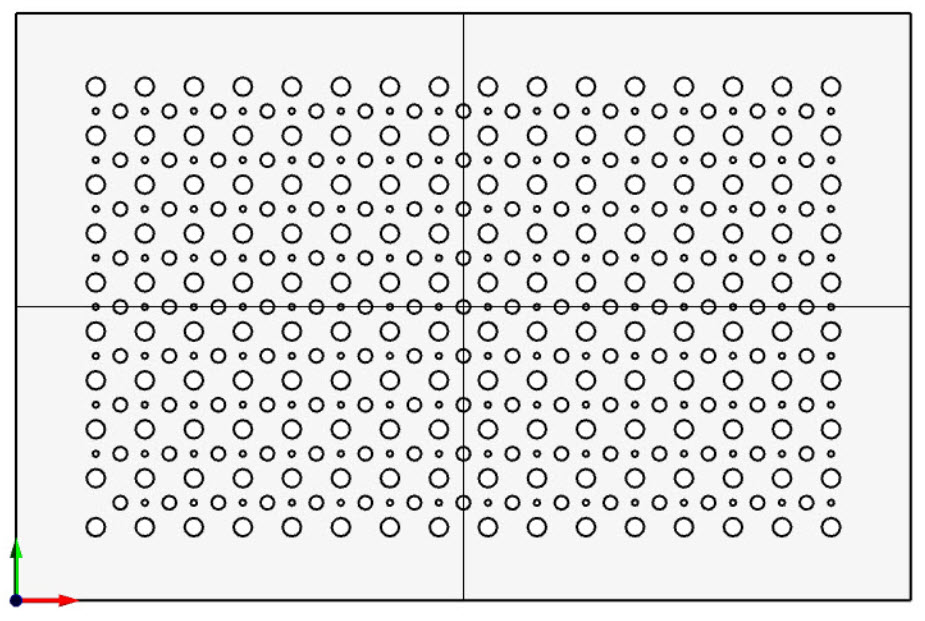
You can see from the part above that there are three different hole patterns of different sized holes that traverse completely through the part. The hole diameters are shown in the illustration below.

Method #1: Using Predefined Regions
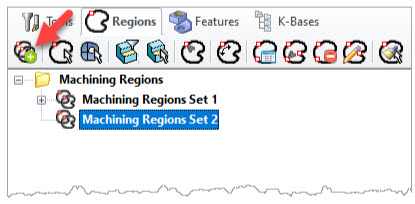
If your drawing consists of 2D geometry, such as circles, then you can use the commands on the Regions tab. This tab is located to the right of the Tools tab on RhinoCAM’s Machining Objects Browser as shown below.
Creating Machining regions works best when using 2D geometry. In the examples below 2D circles are selected as regions.!

The Regions tab toolbar provides commands that will save you a lot of time if you have many identical geometries. In our example we have over 400 holes in three different sizes. The following steps illustrate how these holes can be quickly defined and made available to any Hole operation.
- From the regions tab, pick the Select Curve icon. It is the second from the left on the toolbar.

2. You are asked to select curves for machining regions. Select one 0.750” diameter circle from the part geometry and right-click or press the Enter key.. Our example is a solid model but it works just as well with 2D geometry.
3. A Machining Region Set is created automatically and the new Curve region is added to the set and selected.

4. With the region selected, locate and select the Clone selected machining region” icon. It’s the last icon on the right end of the toolbar.
5. You will see that your geometry is scanned for curves that match your selected region. All matching curves are added to the Machining region as additional Curve Regions. When the scan is completed we see that 159 matching regions were created plus the first region makes a total of 160 regions in the Set.


6. Scroll up and collapse the Machining region Set to make room for the next set.
7. Now select the Create Machining region Set icon (first on the left side of the toolbar) and a new Region set is added.
8. Now repeat steps 1-6 for the 0.559” diameter circles.
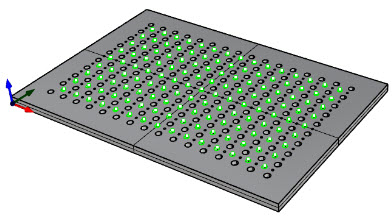
9. Repeat steps 1-5 again for the final 0.25” diameter circles.


10. If you review and collapse all of the Region Sets you will see that you have three sets, one for each of the three hole sizes. 160 of the 0.750” diaa. Holes, Note that the numeric values shown at the end of each Curve Region are arbitrary and are based on the active session only.
If you have a flat area and only one hole size that needs to be machined, you can use the Select Flat Area icon on the Regions toolbar in conjunction with the Flat Area Selection Filter icon. This process will automatically extract all holes located on the flat area into one Region Set.
Method #2: Using the Diameter Range Filter
In this method, hole diameters on a flat area (i.e., on a flat surface) are automatically filtered and selected as control geometry during the Drill operation. Note that this method requires a 3D planar surface with holes.
Here are the steps to filter and select the same holes as is illustrated above. Note that this method requires one Drilling operation for each set of hole diameters. The steps outlined below are for the first 160 holes all of which are 0.750” in diameter. The procedure is repeated once for the 0.550” diameter holes and then repeated again for the 0.250” diameter holes.
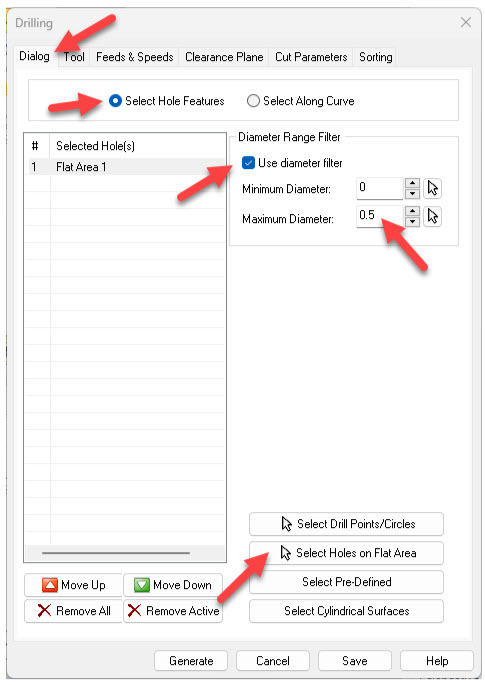
1. From the Holes menu on the Program tab of the Machining Browser, select the Drill icon. This will display the Drilling dialog.

2. From the Dialog tab of the Drilling dialog, pick Select Hole Features at the top of the dialog.
3. You will notice the Diameter Range Filter control on the right side of the dialog.
4. Check the box to activate the Diameter Range Filter.
5. Set the Minimum Diameter field to 0 and set the Maximum Diameter field to 0.5.
6. Now move down to the bottom of the dialog and select the button that says Select Holes on Flat Area.
7. You are prompted to “select flat area to machine”. Now select the flat surface (not a hole) and then right-click or press Enter.
8. You see that Flay Area 1 was added to the Selected Holes list and when you select the Flat Area from the list you see all of the 0.250” diameter holes are selected automatically.

9. You can now continue to define the Drilling operation using the remaining tabs on the dialog.
Add Your Heading Text Here
Lorem ipsum dolor sit amet, consectetur adipiscing elit. Ut elit tellus, luctus nec ullamcorper mattis, pulvinar dapibus leo.


Add Your Heading Text Here
Lorem ipsum dolor sit amet, consectetur adipiscing elit. Ut elit tellus, luctus nec ullamcorper mattis, pulvinar dapibus leo.


