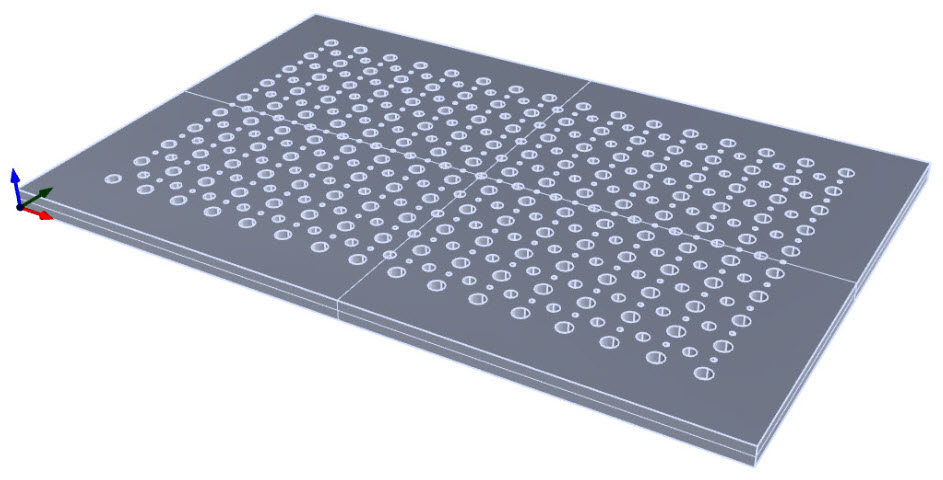
Add Your Heading Text Here
In Part 1 of this blog, we show you how to setup for machining a typical multi-sided part in VisualCAMc for Onshape. It assumes that you have already familiarized yourself on VisualCAMc basics. If you are a new user I recommend that you first review the VisualCAMc Quick Start Guide video. You can also read our additional blog articles here on the MecSoft Blog and on the Onshape CAD Blog – just search for “VisualCAMc” to find the current list of articles. Also for brevity we will not be showing every dialog. We will show you what icon or button to press to display a dialog and then list only those parameters that you need to check. The remaining parameters can remain at their default values.

The Part

Fixturing

Add Your Heading Text Here
Lorem ipsum dolor sit amet, consectetur adipiscing elit. Ut elit tellus, luctus nec ullamcorper mattis, pulvinar dapibus leo.


Add Your Heading Text Here
In the sections below we will define the Machine, Post and Stock. We will also define the Setup for each machining direction as well as a Work Zero for each of these setups. When you are done with this section, the Machining Job tree will look like the one shown here on the right.
Define the Machine

Here are the steps to adjust the Machine definition:
1. Double left-click on Machine listed in the Machining Job tree to display the Machine definition dialog or pick the Machine icon from the VisualCAMc toolbar.
2. From the display window Toggle Display of WCS triad off so that you can better see the MCS triad. Note that the WCS triad is smaller than the MCS triad.
3. Then in the Machine Coordinate System tab of the Machine dialog, set the Spin Angle to 90 (the default),
4. Then pick the X Axis, Y Axis and Z Axis buttons until the MCS is oriented as shown below. This will align the machine to the top (Onshape X Axis). Note that in the image below the WCS triad is toggled Off.
5. When you have the MCS aligned so that the Z axis (Blue) is pointing towards the top of the part, the X Axis (Red) pointing toward the right and the Y Axis (Green) pointing toward the back, pick Save to close the Machine dialog.
6. Now pick the Machine Definition tab and make sure the Number of Axis is set to 3 Axis (this is the default).
7. Pick Save to close the Machine dialog.
Define the Post:
1. From the VisualCAMc Main toolbar, select the Post button or double left-click on Post – None under the Machining Job tree. The Post defines the Post-Processor that you plan to use when generating G-Code. VisualCAMc supports over 300 pre-defined posts for the most popular CNC machine controllers.
2. From the Select Post-Processor dialog pick the Load from Defaults button.
3. From the Add default post-processor dialog select the + button to drop down a list of posts to choose from. For this guide, select Haas from this list and then pick Done to close the dialog.
4. The Haas post is now added to Post-processors list in the Select Post-Processor dialog. Select it and then pick Close. You will now see Post – Haas listed in the Machining Job tree.
Define the Stock:
1. From the VisualCAMc Main toolbar, select the Stock drop-down menu and then select the Part Box Stock option. This will display the Part Bounds Stock dialog. The Bounds section of the dialog shows the size of the part as X: 5, Y: 4 and Z: 1.5.
2. In the Offsets section of the dialog, enter 0.1 for each X, Y and Z fields. This will create a box stock the size of the part and add this amount of offset to each axis. Note that the Z axis is only offset in the positive direction.
3. Pick Save to close the Part Bounds Stock dialog.
4. You will now see that Stock – Part Box Stock is listed in the Machining Job tree.
5. You should also see the Stock displayed around the part. If not, select the Toggle Stock Visibility icon from the display window to toggle the display of the stock.
6. If you want the stock to display in a different color, select the Preferences icon and select a different color from the Stock Colors section of the Color tab of the dialog and then pick Save to close the Preferences dialog.
7. Pick the Save button from the VisualCAMc Main toolbar to Save your document.
Define the Setup(s):
The setup defines the orientation of the Machine Coordinate System for the toolpath operations under it in the Machining Job tree. When you load the Onshape part, there is a setup defined automatically, named Setup 1. Setup 1 should always be aligned with the Machine definition. When you set the Machine definition above, Setup 1 was set to this orientation automatically.
Our part requires machining from four sides. This means that we need four unique setups, one to machine each side. You can create a new setup at any time. Since we know what they are, we will create them all ahead of time.
Here are steps to define the three additional Setups:
1. Double left-click on Setup 1 listed in the Machining Job tree to display the Setup dialog for that setup.
2. Change the name to: Setup 1 (TOP).
3. From the display window make sure the Toggle Display of WCS triad is toggled on so that you can see both the MCS and the WCS triads. Note that the WCS triad is smaller than the MCS triad.
4. Verify that the MCS Z Axis (Blue) is pointing towards the left side of the part, in the direction opposite the WCS X Axis (Red).
If it is not, set the Spin Angle to 90 and then select the X Axis, Y Axis or Z Axis buttons in the dialog until the MCS triad is aligned as shown.
For reference, here are the alignments relative to both the MCS and the WCS for Setup 2 (LEFT). Note the negative WCS axis:
MCS X Axis (Red) = WCS Z Axis (Blue)
MCS Y Axis (Green) = WCS -X Axis (Red>
MCS Z Axis (Blue) = WCS -Y Axis (Green)
5. Pick OK to close the dialog. You will notice that Setup 1 (TOP) is now listed in the Machining Job tree.
6. Now we will add Setup 2. First make sure Setup 1 (TOP) is selected from the Machining Job tree.
7. Then from the VisualCAMc Main toolbar select the Setup button again. This will display the Setup dialog.
8. Change the name to: Setup 2 (LEFT).
9. Verify that the MCS Z Axis (Blue) is pointing towards the left side of the part, in the direction opposite the WCS Y Axis (Green). If it is not, set the Spin Angle to 90 and then select the X Axis, Y Axis or Z Axis buttons in the dialog until the MCS triad is aligned as shown.
For reference, here are the alignments relative to both the MCS and the WCS for Setup 2 (LEFT): Note the negative WCS axis:
MCS X Axis (Red) = WCS Z Axis (Blue)
MCS Y Axis (Green) = WCS -X Axis (Red)
MCS Z Axis (Blue) = WCS -Y Axis (Green)
10. Pick OK to close the Setup dialog. You will notice that Setup 2 (LEFT) is now listed in the Machining Job tree.
11. Now we will add Setup 3. First make sure Setup 2 (LEFT) is selected from the Machining Job tree.
12. Then from the VisualCAMc Main toolbar select the Setup button again. This will display the Setup dialog.
13. Change the name to: Setup 3 (RIGHT).
14. Verify that the MCS Z Axis (Blue) is pointing towards the right side of the part, in the direction of the WCS Y Axis (Green). If it is not, set the Spin Angle to 90 and then select the X Axis, Y Axis or Z Axis buttons in the dialog until the MCS triad is aligned as shown.
For reference, here are the alignments relative to both the MCS and the WCS for Setup 3 (RIGHT):
MCS X Axis (Red) = WCS Z Axis (Blue)
MCS Y Axis (Green) = WCS X Axis (Red)
MCS Z Axis (Blue) = WCS Y Axis (Green)
15. Pick OK to close the Setup 3 dialog. You will notice that Setup 3 (RIGHT) is now listed in the Machining Job tree.
16. Now let’s create fourth and final setup. First make sure Setup 3 (RIGHT) is selected from the Machining Job tree.
17. Then from the VisualCAMc Main toolbar select the Setup button again. This will display the Setup dialog.
18. Change the name to: Setup 4 (BOTTOM).
19. Verify that the MCS Z Axis (Blue arrow) is pointing towards the bottom of the part, in the direction of the negative WCS -X Axis (Red). If it is not, set the Spin Angle to 90 and then select the X Axis, Y Axis or Z Axis buttons in the dialog until the MCS triad is aligned as shown.
For reference, here are the alignments relative to both the MCS and the WCS for Setup 4 (BOTTOM):
MCS X Axis (Red) = WCS Y Axis (Green)
MCS Y Axis (Green) = WCS -Z Axis (Blue)
MCS Z Axis (Blue) = WCS -X Axis (Red)
20. Pick OK to close the Setup 4 dialog. You will notice that Setup 4 (BOTTOM) is now listed in the Machining Job tree.
21. Now you have four setups listed in your Machining Job tree. Take a moment to select each setup and make sure the MCS triads for each are aligned as shown in the illustrations above before moving to the next steps.
22. Pick the Save button from the VisualCAMc Main toolbar to Save your document
Define the Work Zero(s)
A Work Zero is the machining program zero location, where all toolpath coordinates are calculated from. It is like moving the MCS to a location on your stock (or part) where you will be setting the program zero at on your CNC machine. In VisualCAMc you can define one or more Work Zeros under a setup. If no Work Zero is defined, toolpath coordinates are calculated from the MCS Setup location.
For this part we want to define one Work Zero for each of the four setups. For Setup 1 (TOP) and the Setup 4 (BOTTOM), the Work Zero will be set to a corner of the stock box. For Setup 2 (LEFT) and Setup 3 (RIGHT) the Work Zero will be set to a corner of the part box. Why? Because the top (Setup 1) will already be machined, exposing a clear indicator for the corner of the part, thus increasing the accuracy of locating the machined features in setups 2 and 3. As you work through the tutorial you will begin to understand why these locations are selected.
Here are the steps to create the Work Zero(s):
1.Select Setup 1 (TOP) from the Machining Job tree.
2. Then from the VisualCAMc Main toolbar select the Work Zero button. This will display the Work Zero dialog. Make these selections:
For Type, select Set to Stock Box.
For Face select Highest Z.
For Position select South West. You should see the MCS triad move to the location on the stock shown below:
3. Now pick Save to close the dialog. You should see Work Zero listed under Setup 1 (TOP) in the Machining Job Tree.
4. Now select Setup 2 (LEFT) from the Machining Job tree.
5. Then from the VisualCAMc Main toolbar select the Work Zero button. This will display the Work Zero dialog.
For Type, select Set to Part Box.
For Face select Highest Z.
For Position select South East. You should see the MCS triad move to the location on the part shown below. You may have to right-click-drag in the display window to orient the part to see the Work Zero clearly:
6. Now pick Save to close the dialog. You should see Work Zero listed under Setup 2 (LEFT) in the Machining Job Tree.
7. Now select Setup 3 (RIGHT) from the Machining Job tree.
8. Then again, from the VisualCAMc Main toolbar select the Work Zero button. This will display the Work Zero dialog.
For Type, select Set to Part Box.
For Face select Highest Z.
For Position select North East. You should see the MCS triad move to the location on the part shown below. You may have to right-click-drag in the display window to orient the part to see the Work Zero clearly:
9. Now pick Save to close the dialog. You should see Work Zero listed under Setup 3 (RIGHT) in the Machining Job Tree.
10. One more to go. Select Setup 4 (BOTTOM) from the Machining Job tree.
11. Then again, from the VisualCAMc Main toolbar select the Work Zero button. This will display the Work Zero dialog.
For Type, select Set to Stock Box.
For Face select Highest Z.
For Position select North East. You should see the MCS triad move to the location on the part shown below. You may have to right-click-drag in the display window to orient the part to see the Work Zero clearly:
12. Now pick Save to close the dialog. You should see Work Zero listed under Setup 4 (BOTTOM) in the Machining Job Tree.
13. Take a moment to inspect the Machining Job tree. You should see a Work Zero located directly under each Setup as shown here. Take a moment to select each Work Zero to confirm its locations relative to the stock or part as indicated in steps above.
14. Pick the Save button from the VisualCAMc Main toolbar to Save your document.
15. Your multi-sided setups are completed. You can now start programming the part.
16. First select the Work Zero under the Setup that you wish to start creating toolpaths for.
17. Then select one of the toolpath strategies from either the 2-1/2 Axis 3 Axis or Holes menus located on the VisualCAMc Main toolbar.
![]() | ![]() | ![]() |
Let’s Review:
1. You can machine multi-sided parts in VisualCAMc using Setups.
2. Edit your Machine definition to match your machine tool.
3. Create additional setups for each machining direction.
4. Each setup can have one or more Work Zeros and contain all of the toolpath strategies needed for that setup.
5. Look for Part 2 of this blog that illustrates machining Setup 1 (TOP).
Try It Yourself
If you want to learn more about the VisualCAMc Milling plugin for Onshape, check out MecSoft’s Products Page, and YouTube Channel for what’s new, specifications, videos, tutorials and more. To get VisualCAMc go to the Onshape App store and add VisualCAMc to your Onshape account. Enjoy!
Try VisualCAMc For Onshape
This powerful cloud-based CAM tool works directly inside your Onshape Documents.