To see this tutorial and more, watch the full-length video here!
 G-Code Analysis
The G-Code Editor module includes tools for visualizing, analyzing and simulating your g-code files. You may be asking “But I can do this in the MecSoft CAM MILL module, right?” In the MILL module you are creating and visualizing toolpaths but not g-code. The actual g-code is not created until you post-process your toolpaths. During post-processing your toolpaths are converted into g-code files that are formatted specifically for your CNC machine’s controller software. In the G-Code Editor module you are looking at the actual g-code that your CNC machine is reading.
Backplot & Tool Motions
A “backplot” of a g-code file is the visual representation of the toolpaths that are defined by the g-code file. The backplot will display the entry, approach, engage, cut, departure and retract motions. A backplot is displayed automatically when you load a g-code file into the G-Code Editor. Here are the basic steps:
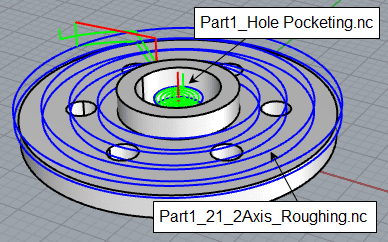
1. In our example part we have programmed several 2½ Axis and Hole Making toolpaths using the MILL module in RhinoCAM. Below is how the part and Machining Job tree looks in RhinoCAM-MILL.

2. Here is a closeup of the Machining Job tree:

3. From the RhinoCAM Main Menu we select G-CODE EDITOR and the G-Code Editor Browser displays on the left side of the screen by default. As in all MecSoft CAM modules you can dock or undock the browser to any location on the screen that you wish.

4. From the Project tab of the G-Code Editor Browser we select Load.

5. We navigate to the folder where our g-code files are located, select the g-code file for the first operation in the machining job named “Part1_2 1_2 Axis Facing.nc” and pick Open. The g-code file is listed in the Project tree along with a list of the cutting tools that the file references.

The flag next to Tool #7 in the Project tree indicates that the tool was not found in the Tool Crib. Refer to the topic How Cutting Tools are Used located in Part 1 of this tutorial.
6. A backplot of the g-code is also displayed on the screen as shown below.![]() It is important to note that you DO NOT have to have part geometry loaded in order to view and/or edit g-code files in the G-Code Editor. We are showing the part geometry here because this is the part we used to create the original toolpaths and g-code files.
It is important to note that you DO NOT have to have part geometry loaded in order to view and/or edit g-code files in the G-Code Editor. We are showing the part geometry here because this is the part we used to create the original toolpaths and g-code files.

7. You can change the backplot colors from the G-Code Editor Preferences dialog. Select the Preferences icon ![]() to display the Preferences dialog and navigate to the Toolpath section as shown below. From here you can also control the display thickness of the back plot and set other toolpath related preferences.
to display the Preferences dialog and navigate to the Toolpath section as shown below. From here you can also control the display thickness of the back plot and set other toolpath related preferences.


