The Trinket Box by Bernie Solo. Base – Part 2 of 2
Blog Categories
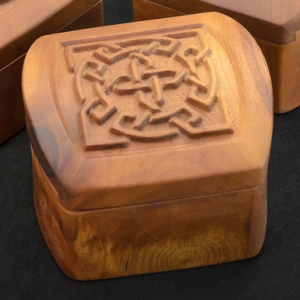
This two-part blog post discusses the programming of “The Trinket Box” designed by Bernie Solo of Solo Studio Works (www.solostudioworks.com) (Ortonville MI) using RhinoCAM.
The wood is cherry, harvested by Bernie himself. For new users, this 2-part post can be very instructional on how to approach the machining of parts requiring both 2½ Axis and 3 Axis toolpaths from one and two sides (flip machining) made of reclaimed cherry wood.
In Part 1 we saw how Bernie programmed the embossed lid of The Trinket Box. In Part 2 here we see how Bernie approaches the machining of the Trinket Box base.
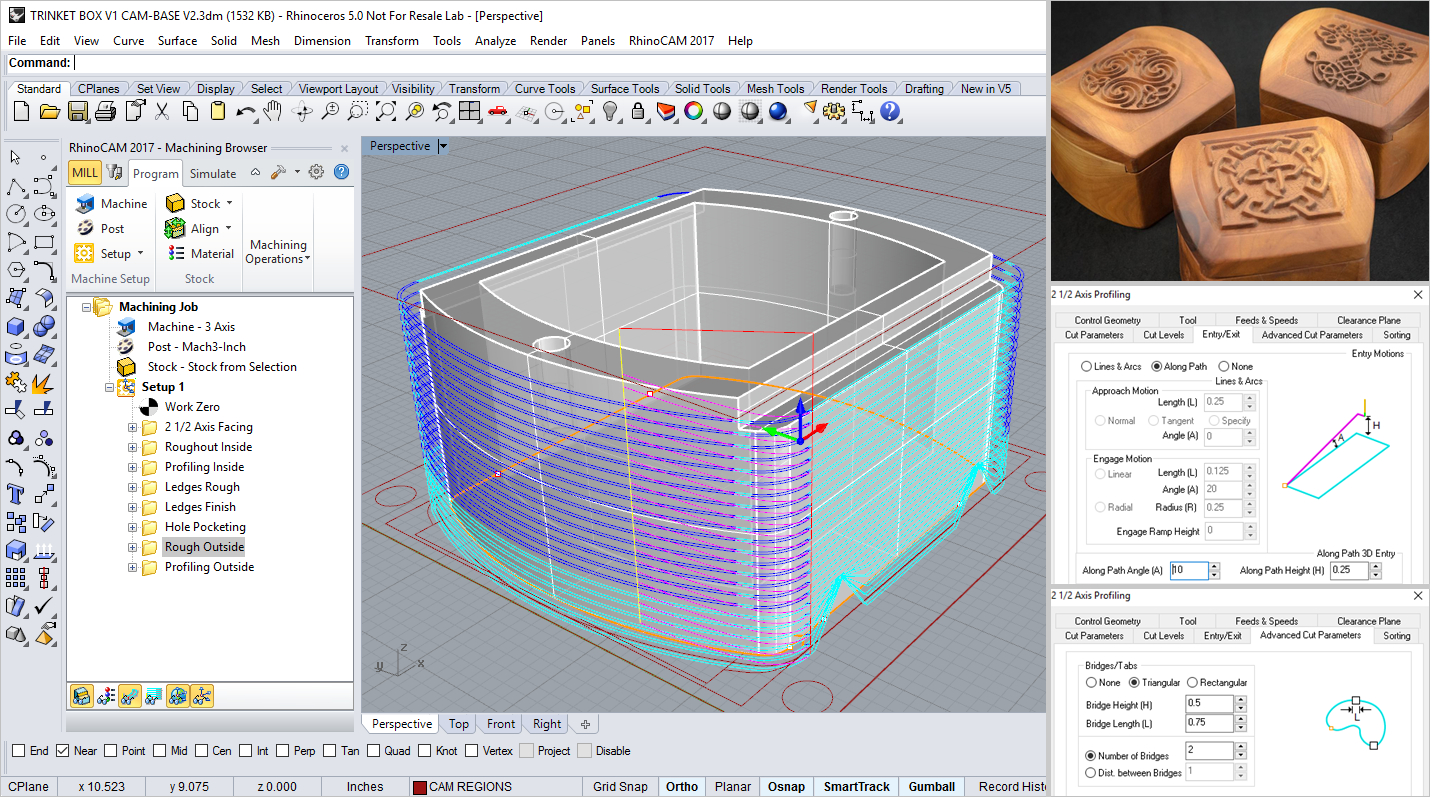
Similar to the lid, Bernie has modeled the stock in Rhino along with the part and utilizes the Stock from Selection option in RhinoCAM. You will see from the Machining Job tree on the left (image below) the toolpath strategies Bernie uses. These are all 2½ Axis toolpaths, Facing, Pocketing, Hole Pocketing and Profiling.
RhinoCAM 2017 is showing the 2½ Axis Profiling operation used to rough out the outside perimeter of the box. The other toolpath operations used are listed under Setup 1 in the Machining Job tree. (Inset Top Right) The completed Trinket Box designs are shown. (Inset Middle Right) The Along Path 3D entry motion parameters are shown from the Entry/Exit tab of the 2½ Axis Profiling operation dialog. (Inset Bottom Right) The automatic Bridges & Tabs parameters are shown from the Advanced Cut Parameters tab of the 2½ Axis Profiling operation dialog.
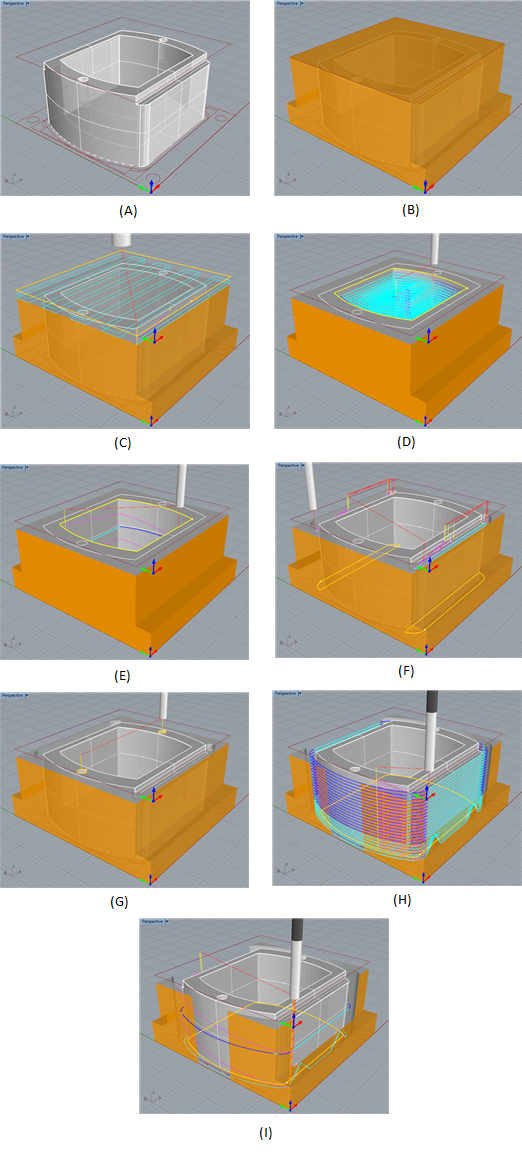
The sequence of images below shows the procedure Bernie uses to machine the base of the Trinket Box. Note the 3 Axis Re-Roughing (D) and the nice 3D Ramp approach motion on his 2½ Axis Profiling (F) and (G) operations.
A. The part is modeled in Rhino 5. Note the reference lines Bernie has drawn on the XY plane. These are used as modeling aids and for toolpath containment purposes.
B. The Stock is displayed. It was created from geometry that Bernie modeled in Rhino and used in the Stock from Selection option in RhinoCAM.
C. Bernie starts with a 2½ Axis Facing operation using a ¾” Facing Mill and a Linear Cut Pattern at a 75% stepover. Two cut levels are used for a ¼” total cut depth.
D. Next we see a Pocketing operation used to rough out the inside of the box. A ¼” End Mill, Offset Cut Pattern and 50% stepover is used. The total cut depth is 2” so he splits that up into a roughing depth of 1.99” at 0.1” depth/cut and a finishing depth of 0.01” at 0.01” depth per cut. All of these roughing and finishing parameters are found on the Cut Levels Tab.
E. Next Bernie uses a Profiling operation to finish the inside walls of the pocket using a ¼” Flat Mill. Here the depth is set to 2” and the depth/cut is set to 1” resulting in two passes along the inside walls. Notice the Along Path 3D ramping engage motion (shown in magenta) at each of the two cut levels. The ramp height is set to 1” at a 10 degree angle so the ramp extends along two sides of the pocket, sweet.
F. For the two side ledges, Pocketing operations are used, one for roughing and another for finishing with ¼” End Mill.
G. Here, Hole Pocketing is used for the two 0.8” deep holes on the top of the box. Hidden are the nice helical motions used to pocket the holes. Here the Helix Dia is set to 0.029” and the Helix Pitch is set to a Height of 0.25”.
H. This is the first of two Profiling It is used as a roughing operation to remove material around the outside of the box. Notice the 3D Ramping approach motions (shown in magenta) Bernie uses at each cut level. Each is 0.25” long at a 10-degree ramp angle. Also, notice the four triangular Bridges & Tabs created on the sides of the Profiling cut. These can be added automatically to allow the part to remain stationary with the stock during machining.
I. The second Profiling is used as a finishing operation. Similar to the inner pocket (E), it includes two levels. Total Cut Depth is 2.26” and Rough Depth/Cut is 1.13”. Also included is the 3D Ramping approach motion (shown in magenta), this time set to 1” inches long at a 10-degree angle. Notice how the approach ramp wraps completely around one side of the box for a nice finish leading!
RhinoCAM is the GO TO choice of Makers world-wide for its accuracy, affordability, ease of use and wide range of configurations from Express to Premium, encompassing 2 through 5 Axis milling as well as turning modules. All completely integrated into Rhino 5. Don’t have Rhino? No problem, download VisualCAD/CAM, the stand-alone version with all of the same features as RhinoCAM! For more information about Bernie Solo, we invite you to visit his YouTube channel WorksbySolo as well as on Facebook and Instagram.
From the blog
The latest industry news, interviews, technologies, and resources.
MK Fabrication, a sister company of General Fence, Inc., is a growing full service fabrication shop with mobile capability. Built on quality and customer service,
MK Fabrication, a sister company of General Fence, Inc., is a growing full service fabrication shop with mobile capability. Built on quality and customer service,
With the release of RhinoCAM 2024 and VisualCAD/CAM 2024, new functionality and changes are being introduced. We have improved the quality of our product with
MecSoft Releases RhinoCAM 2024 and VisualCAD/CAM 2024 Dana Point, CA, Feb 26, 2024: MecSoft Corporation, the developer of industry-leading CAM software solutions, has announced the
 This two-part blog post discusses the programming of “The Trinket Box” designed by Bernie Solo of Solo Studio Works (www.solostudioworks.com) (Ortonville MI) using RhinoCAM.
The wood is cherry, harvested by Bernie himself. For new users, this 2-part post can be very instructional on how to approach the machining of parts requiring both 2½ Axis and 3 Axis toolpaths from one and two sides (flip machining) made of reclaimed cherry wood.
In Part 1 we saw how Bernie programmed the embossed lid of The Trinket Box. In Part 2 here we see how Bernie approaches the machining of the Trinket Box base.
Similar to the lid, Bernie has modeled the stock in Rhino along with the part and utilizes the Stock from Selection option in RhinoCAM. You will see from the Machining Job tree on the left (image below) the toolpath strategies Bernie uses. These are all 2½ Axis toolpaths, Facing, Pocketing, Hole Pocketing and Profiling.
This two-part blog post discusses the programming of “The Trinket Box” designed by Bernie Solo of Solo Studio Works (www.solostudioworks.com) (Ortonville MI) using RhinoCAM.
The wood is cherry, harvested by Bernie himself. For new users, this 2-part post can be very instructional on how to approach the machining of parts requiring both 2½ Axis and 3 Axis toolpaths from one and two sides (flip machining) made of reclaimed cherry wood.
In Part 1 we saw how Bernie programmed the embossed lid of The Trinket Box. In Part 2 here we see how Bernie approaches the machining of the Trinket Box base.
Similar to the lid, Bernie has modeled the stock in Rhino along with the part and utilizes the Stock from Selection option in RhinoCAM. You will see from the Machining Job tree on the left (image below) the toolpath strategies Bernie uses. These are all 2½ Axis toolpaths, Facing, Pocketing, Hole Pocketing and Profiling.
 RhinoCAM is the GO TO choice of Makers world-wide for its accuracy, affordability, ease of use and wide range of configurations from Express to Premium, encompassing 2 through 5 Axis milling as well as turning modules. All completely integrated into Rhino 5. Don’t have Rhino? No problem, download VisualCAD/CAM, the stand-alone version with all of the same features as RhinoCAM! For more information about Bernie Solo, we invite you to visit his YouTube channel WorksbySolo as well as on Facebook and Instagram.


